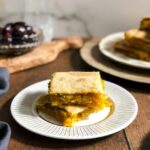
Pumpkin or winter squash pita
A winter squash pita to rival any pumpkin pie
Servings: 24 pieces
Equipment
- Colander
- Rolling pin
- Baking tray
Ingredients
For the filling:
- 7 cups grated pumpkin or other orange fleshed squash
- 1/2 cup grated yellow onion
- 1/4 cup granulated white sugar
- 1/2 cup long-grain rice
- 1/4 cup Greek olive oil
- 1/2 teaspoon salt
- 1/2 teaspoon ground cinnamon
- 1/4 teaspoon ground black pepper
For the dough:
- 700 grams all-purpose flour
- 2 cups (500 mL) hot water
- 1/3 cup (80 ml) + 2 tablespoons (30 mL) vegetable oil
- 3/4 teaspoon salt
- 2 tbsp (30 mL) Greek olive oil
Instructions
- Place your grated squash in a large colander and allow it to drain and soften for at least one hour, or overnight. If you plan on letting it sit overnight, place in the refrigerator and then bring to room temperature before proceeding. If you will only let it sit for a minimal amount to time, you can massage your grated squash with your fingers, to soften it up.
- In the meantime, soak your uncooked rice in water, at room temperature, for at least 60 minutes. Your rice should be covered by at least one inch of water.
- Using a cheesecloth, a clean kitchen towel, or your hands, drain as much of the water out of the squash as possible.
- Next, using the same method, squeeze as much water out of the grated onion as possible. Combine the squash and onion in a large bowl.
- Drain the rice and add that to the bowl containing the squash.
- To this bowl add the 1/4 cup granulated sugar; 1/4 cup olive oil; 1/2 teaspoon salt; 1/2 teaspoon cinnamon; and 1/4 teaspoon ground black pepper. Set the filling aside.
- Preheat your oven to 350 degrees Fahrenheit. Grease a 13 x 17 inch baking tray and set aside.
- Now, it is time to make the phyllo dough. Place your flour into a large bowl and add the 2 cups of boiling water to it. Next add the vegetable oil and salt.
- Carefully, so as to not burn yourself (remember, the water was hot), begin to mix together the dough with your hands. Mix and then knead for about 5 – 10 minutes until you get a soft and pliable phyllo dough.
- Divide the dough into two pieces, with one slightly larger than the other; this will be the bottom of your pita.
- Take this slightly larger half piece of dough and divide it into two. Lightly flour your counter top or table and using a rolling pin begin to roll out each dough half. When each piece is an oval shape, about 20 to 30 centimeters in length, use your fingers to spread about 1/2 tablespoon of olive oil onto the surface of each. Then, flip one oval shaped piece of dough on top of the other, oiled sides meeting together. Using your rolling pin continue to roll out the dough until it is large enough to cover the base of your baking tray and come up the sides. The dough should also be thin enough that you can almost see through it.
- Once your phyllo dough has lined the bottom of your baking tray, you can introduce the squash filling. Spread the mixture evenly and use a fork or the back of a spoon to gently press down on the filling to make sure you don’t have any void areas.
- Roll out the remaining dough by repeating the process above. When you have rolled it out enough, carefully transfer it to the baking pan and cover your filling. Crimp the lower and upper layers of dough together and cut off the excess.
- Using a very sharp knife, gently score the top layer of dough; this will enable you to mark out the pieces of pita that you will ultimately cut.
- Using a pastry brush, gently brush the top of the pita with olive oil.
- Place your pita in the middle rack of your pre-heated oven and bake for approximately one hour. Remove from oven when the top of your pita is nicely browned. Allow to cool for at least 10 minutes before cutting into serving pieces.
- Leftovers should be kept in the refrigerator.
- Enjoy!
